This tutorial will take you from this:
I got the original idea for a word art print this from this site. These prints on this site are amazing, but I'm told they can run into the hundreds of dollars and I can often make my versions 11' x 14' (or 27.5x35cm) for under $20!
For this tutorial, I'm going to assume you have (or can get!) a basic knowledge of how to use Picasa (Google's free photo editing software). Click on the link to download if you don't currently have it.
I am a HUGE fan of Picasa, and as I'm still relatively new to Photoshop I still mostly use Picasa to edit and upload blog photos. It's very user friendly and has some great quick editing functions. I love the ability to create quick collages for blog posts, and it is really easy to upload into a web album which the blog can access as well.
So back to the print now.....
Take 1 original photo and edit in Picasa. It's best to use a photo for the background that has similar tones and not too much difference between the light and dark parts of the photo. Double click on the photo to access the editing tools.
Use both the tuning and effects tabs to lighten up the photo to your taste. I would tend to use the Fill Light, Highlight, and Tint effects to do this.
I actually edited mine in Photoshop using an Action which give a slightly different effect (see below) but I'll keep it simple and just use Picasa for this tutorial.
Crop the photo to the size you want. I created a new custom aspect ratio so that it would completely align with the 27.5x35 poster size dimensions I wanted to print on Snapfish (to fit in the frame I knew I wanted to put it in).
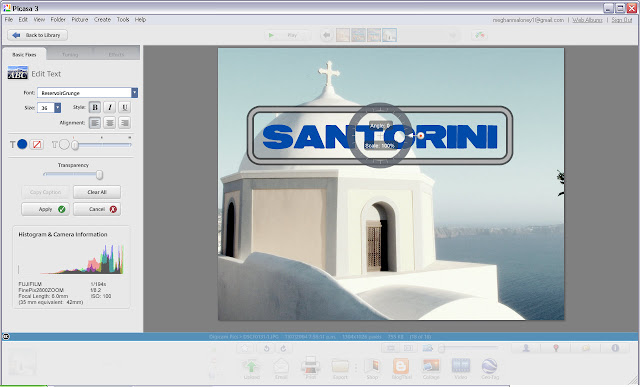
On the basic fixes tab, use the Text tool to create your text. I selected 4 different font types for my photos for a good contrast. These were Impact, Century Gothic, GunsuhChe, and ReservoirGrunge. Depending on the look and feel of your photo you can play around with heaps of different fonts to see which combinations look good together.

Type your text onto the photo. You can change size of the selected text by zooming the wheel in and out and you can rotate 360 degrees as well.
You can also edit size, colour, bold, and transparency on the left hand side.
Rearrange all your different text by clicking over each text group and move as desired until you are happy with the finished product.
Upload onto Snapfish (or other online photo shop). I always choose the highest maximum file size upload option to keep the quality of the photo you want to use for your print or canvas as good as possible.
N.B. It's worth signing up to receive emails of special offers from these online sites. You often get access to free 6x4 prints just for signing up. And if you can wait until there's a deal on to get 40-50% off prints, photobooks, canvases etc, then even better! I don't think I've ever had to order anything at full price.
Once you have uploaded your file, then order the print or canvas in the size you have created.
Happy creating, the possibilities are endless.
If you would like any questions answered or any more detail, just drop me a comment below, or email me directly and I'll be very happy to help!


6 comments :
This is such a beautiful artwork and fantastic tutorial. Well done and thank you x
Wow, thanks for this tutorial ... I am hoping to become a bit more creative with my photography this year and I think I could do something like this (when I find the time) :)
Thanks for the tutorial, this is gorgeous and I love how it can be customised. I have seen big pieces similar to these in shops and they are sooo expensive!
Looks fantastic, will have to have a go! I might start off with a photo of my daughter and pop her name in the middle, and use words that describe her (or even the meaning of her name from different books, the verse from the bible her name comes from) etc. Oh - the possibilities are endless! Thanks heaps!
Hi MnM's. Thank you thank you thank you. You got the tutorial whizzed up in no time. Sorry I didn't log on earlier to acknowledge you. My 16 year old wants to make wake boarding collages for his walls and I was telling him to wait as I had a feeling I would be able to help him do something amazing once my "friend" had a chance to write out the steps for me. Yes you are a "crafty chick" - thanks J x
This is fantastic. You could do so much with this. Thank you so much for sharing this awesome tutorial. Can't wait to be able to play around with this. Bookmarking, pinning and sharing. Thank you!
Post a Comment