Showing posts with label How To. Show all posts

17 February 2016

How to style a boy's bedroom on a budget {or how we did it anyway!}

When we moved into our newly built house, we wanted to update some of the boys furniture in their rooms particularly since it was an eclectic mix of items we'd gradually collected over our years in Wellington and nothing went together particularly well.

But with a limited budget (we've spent a fortune building the house let's not forget!) we had to be smart about styling the boys' bedrooms on a budget to create a fresh and modern look without breaking the bank.

During the build process we made the decision to put in wardrobe storage solutions in each of our bedrooms during the build. This was such a good idea as it reduces the need for having a set of drawers in the bedroom taking up space. Even though Mylo ended up with a smaller version (due to a skinny hall cupboard on the other side of his wardrobe in the house plan), both boys have more than enough room to hang all their clothes or have them folded away in the drawers as well as storing most of their toys and books neatly away out of sight in their wardrobes. This definitely helps make their rooms feel bigger and less cluttered for a start.


Between the wardrobes and the additional room furniture I'm really pleased with how spacious and modern their rooms are - they have a few similar pieces of furniture in their rooms but still enough variety in colour scheme and individual items to make each room their own. Plus there's room to add more at a later date if we want to.

Here's how we did it:

Designers Choice Junior Cooper Duvet Cover from Farmers $149.99
This is a reversible duvet cover with a fun geometric print on one side and a lovely nautical stripe on the other.  I love both sides of the design and we mix it up as to which one has the design face up on the bed at any one time.


We certainly didn't pay full price for these duvet covers - buying them during their big New Years Sale with at least 50-60% off full retail price if I remember correctly.

Workspace Sam Chairs in Blue and Green from Warehouse Stationery $59.99-$79.99


Vigo Desk from Mocka $129.99
If you don't mind a bit of DIY furniture, then building flat-pack furniture from Mocka is a great value option for stylish, low cost items and the free shipping NZ wide no matter how large or small the order is a big plus point too.


Mocka Storage Unit - Two Cubes in Blue and Green from Mocka $59.99
Again Mocka came up trumps with these small storage units that function well as bedside tables to keep the kids books, drink bottles and alarm clocks on - as well as a few treasures to safely stow away in the cupboard below.


Scandi Shelves (Hexagonal and House design) from The Warehouse - $20-$40 for a set
These aren't identical to the ones I purchased (I bought a set of 3) but you get the basic idea. I can't now find the original versions I bought online now but they may still be in stores.


I love that the boys can mix up which of their treasures are displayed on their shelving at any one time.  A word of warning though - you do need to be prepared to spend the time and energy using your maths brain to get the calculations right to get the shelving straight and centred with even spacing between - if that's the look you're going for. And if you don't already have one, invest in a spirit level when hanging these - you won't regret it! We hung the Hexagonal shelving with normal picture hooks but the house shelves had a slightly different hanging system so we just used some small screws in the wall to hang these.

Home and You Riverside A2 Grey frame from The Warehouse $25-30
Both boys had created one particularly colourful piece of art from school last year that I knew I wanted displayed in pride of place on their walls - Noah's was a fish picture and Mylo a crazy colour pattern picture. These grey A2 frames with an A3 mat inside were the perfect way to display them on their walls.


I'd bought quite a few of these items within a week or two of moving in and hadn't had any time to get the rooms properly set up until now so it's been rather satisfying seeing my vision of styling the boy's rooms finally come to fruition.


17 December 2013

Rice Crispy Treats: Edible Christmas Trees

I actually didn't have the time to make these Rice Crispy Treats (also known as Edible Christmas Trees) this weekend. But do you think I let that stop me?! And there's nothing like throwing another iron in the fire of an already busy weekend just to really spice things up in the time management department right?! I thought these would be fun to make so was determined to find the time to fit them in. This is also the first year I've seen mini MNM's sold in festive packs only containing red and green candy so there was an added incentive to put them to good use instead of having to buy multiple packs and having to sift through them all just to get the red and green ones.


Now I'm not going to lie to you and tell you that these were super easy and quick to make. They SO weren't. So if patience and precision is not your forte when you're crafting you may want to think again about making these right about now. However, I do promise you if you are prepared to stick with it (and silent cursing IS allowed along the way believe me!) you'll love the results.

Rice Crispy Treats: Edible Christmas Trees


What you'll need:

3 cups rice bubbles / rice crispies
1 cup dessicated coconut
1/4 cup icing sugar
250g block of white chocolate or white chocolate melts
5 heaped tsp of coconut oil or 50g kremelta
Silver cachous balls
2 packs of mini festive MNM's
Baking paper
Stapler

How NOT to make these:

Before you even think about mixing up any ingredients, prepare the cone shapes. You'll thank me for this tip. Unlike me who thought I could multi-task and do everything at the same time and then found making the cones way more challenging than I had bargained on and was sitting with the mixture all ready to go still fighting a losing battle with the baking paper and worrying that it would all solidify en-masse before I could get them stuffed into the cones. This was not helped by the fact I DIDN'T have any staples. And in case you've never tried this at home, sellotape does NOT stick to baking paper. Not a jot. Nor does masking tape or any other kind of tape for that matter. I had to resort to the glue gun and I made a hell of a mess in the process and burnt my fingers several times. So now that we've got all my schoolboy errors out of the way let's focus on making this the right way!

How to actually make the Edible Christmas Tree Rice Crispy Treats:

1. Cut 4 30cm x 30cm squares of baking paper, then cut them diagonally so you have 8 triangles.
2. Join the baking paper pieces together and shape into a cone shape, being patient as you do this! Staple the baking paper together to hold in place.
3. Mix the rice bubbles, coconut, and icing sugar together in a bowl.
4. At the same time, put the coconut oil/kremelta and 200g of white chocolate over a low heat and heat until melted.
5. Mix the chocolate into the dry ingredients.
6. Take spoonfuls of the mixture and fill up the cones, pressing gently to pack down firmly as much as possible.
7. Lay the cones on a baking tray and put in the freezer for an hour to set.
8. Melt the remaining chocolate in the same bowl. Once this is cool, dip the MNM's and silver balls into this mixture and use the chocolate as a glue to attach the MNM's and balls to the tree.
9. Return to the freezer for an hour to ensure they set completely and then store in the fridge until ready to eat.

Be sure to check out some of my other great Christmas gift ideas: 

Cinnamon Scented Candles
Cookies in a Jar
Chocolate Lip Gloss
Fizzy Bath Bombs
Giant Hanging Snowflakes
Christmas Tinsel Wreath
NOEL Word Block Wall Art

18 September 2013

Family Fun: Real-life Ghost Mansion

A few months back Mark invested in a Wii U game console. It came with a whole load of games that are straight forward enough for the kids to play. One of these games is called Luigi's Ghost Mansion.

Cue scary music.


The basic premise of the game is that the person with the game pad is the Ghost. The Ghost can see the other players wandering around the house and has to try to sneak up on them and grab them without the other players shining their torch on the Ghost.


The other players have normal game controllers and are looking at the game on the TV screen. They can't see the ghost but when the ghost gets close enough their game controllers vibrate so they know the ghost is not far away and that they'd better run or shine their torch quick smart.

If the ghost gets the torch shined on him enough times, he loses his power and the game is over. But if the ghost grabs the players twice, they are out for the count and the game is over.

The boys enjoy the game so much they asked if we could play a real-life version around the house.

Here's how we play:

  1. Wait for it to get proper dark. 
  2. Give all the players a torch except the ghost. 
  3. The ghost then goes and hides somewhere in the house.
  4. The players go looking for the ghost with their torches on.
  5. If the ghost jumps out at the players before they turn the torches on, they are the winner.
  6. If the ghost gets found first, the other players win.
Cue a whole lot of heart-pumping adrenalin, a fair bunch of screaming, and general crazy mayhem. 

A trap is set to make it look like there's a ghost hiding under the covers - but really it's just pillows

Everything looks waaaaaaaaaaaaaaay spookier in the dark don't you think!

It sure takes hide-n-seek to a whole other level!


05 August 2013

Olympic Party Extravaganza

Take one games-mad kid and one party mad mama. All this adds up to a pretty good formula for a fun-filled occasion otherwise known as a Kid's Olympic Party Extravaganza.

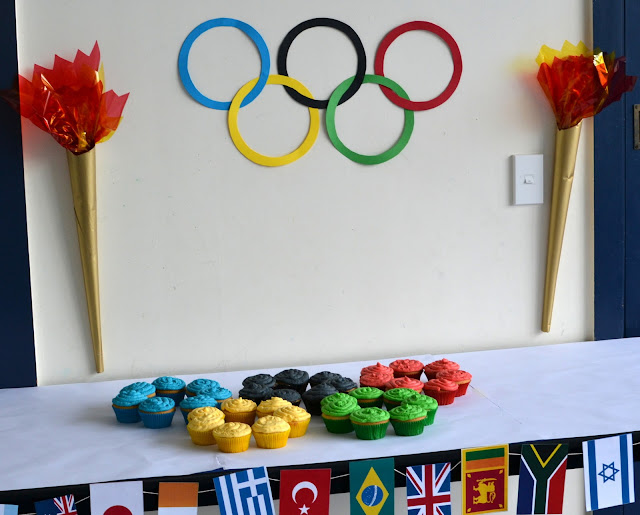
kids olympic party theme table

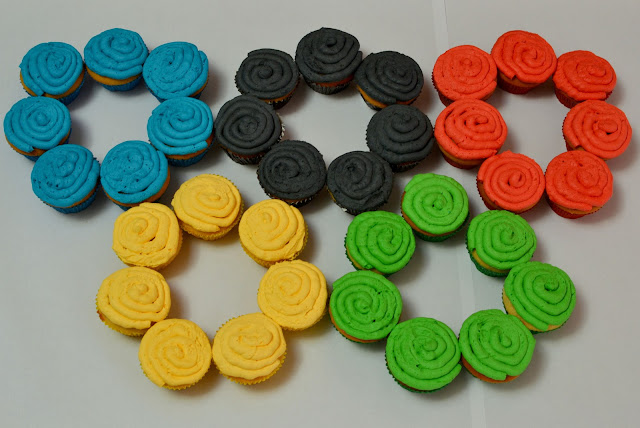
This was a reasonably straight forward party to plan, other than having to make the five different batches of coloured cupcakes of course. But I'd planned ahead and made the cupcakes last weekend, and only had to worry about the icing yesterday.

You could of course have coloured the cupcakes themselves too, but I drew the line at coloured cases and icing as that in itself took enough time.

The flag bunting was simple enough to create from paper templates glued onto cardboard and held together with string, whilst the Olympic torches were made from rolled up cardboard, wrapped in gold wrapping paper with red and yellow cellophane cut out to look like fire to go in the middle.

olympic ring cupcakes

olympic ring cupcakes olympic party

Olympic torch popcorn added to the theme - microwave popcorn popped inside ice-cream cones.


And Olympic ring jars painted in the colours of the Games and filled with co-ordinated tasty coloured sweets.

olympic ring sweet jars

The themed plates were standard heavy duty cardboard plates with an Olympic ring template glued in the middle, and the drinks were a pack brought from the supermarket where I'd just removed the labels and replaced with our very own Olympic-ade labels, perfect for giving our guests a mid-party sugar pick-me-up.


Our teams arrived ready for action - we'd chosen Great Britain - the host of the last games in 2012 and Brazil - the host of the next Olympic Games in 2016.


We kicked off our Olympic Games with the Javelin throw. The kids did a great job throwing with all their might.


And surprising us with how far they could actually get.

kids olympic party theme


Next up was target shooting at the rifle range.


Where a steady hand and straight aim guaranteed the biggest points.


Next up: the hoop relay.


The hoops gave the kids a good run for their money for a while on the slippery court.


They won in the end though.


Then it was time for a hearty balloon stomp.


 Ready, set, go!


The balloons also proved quite tricky to pop, easily sliding out from under foot on the shiny court.


The best plan of attack proved to be holding one's foot on the balloon gradually with more and more weight.


Inside each balloon were points to be gathered - 1, 2 or 5 points. The little chap below somehow managed to score 25 points and beat the rest of the crew in this game!


Then it was kai (food) time. Burger rings and Stripes ringed biscuits accompanying our Olympic theme, and the country flags in the club sandwiches proving a good discussion point over dinner time.


Although it never fails to surprise me how very little kids end up eating at parties. They are always having way too much fun talking and generally mucking about to be seriously interested in gobbling up the food!


Then it was time to sing our guest of honour Happy Birthday.


And the candles went out in one big puff!


Then it was back into the games. The kids loved Ping Pong Pitch (although you might know it as Beer Pong if you're an adult), but rest assured there was only water in these glasses and no sculling was required.


The last game saw the teams battle it out to match up the flags with the countries in the quickest time and they all did it surprisingly fast.


Then it was time to add up the team points: Brazil took out the Silver Medal winning position and Great Britain the Gold Medal place. In the next picture, Noah looks like he is howling in tears but he is in fact cracking up at his dad's resounding rendition of  God Save the Queen just out of shot.


Before he decided to join in too.


And if your wondering how you can tell whether the party was a success? When the birthday boy comes home, flings his arms around you and declares it to be the 'best party ever'. That is until next year anyway!


Special thanks to Nana, Poppa, Jackie, Heidi and Nikki for helping make the day such a success too.

LinkWithin

Related Posts with Thumbnails