
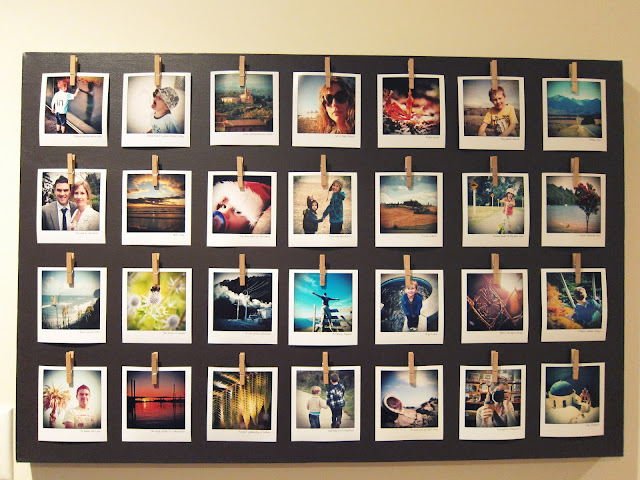
Each new visitor to our kitchen always stops and admires, and often asks how it was created. So now you need to wonder no more lovely people, because here are all the instructions for you to create your very own.
Creating the photoboard
Firstly, I need to give credit to the lovely Sarah over at FaerySarah who has kindly given me the link to her original instructions on how to make the actual photoboard itself. So rather than reinvent the wheel for you all by giving you a long list of instructions myself, just head over here and print off these fantastic instructions, or alternatively click on this photo below and print off.
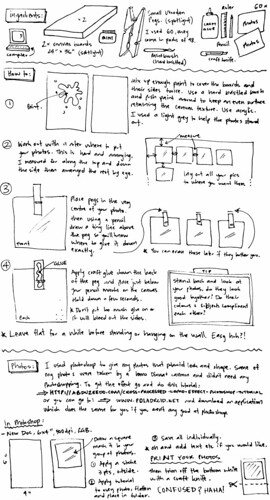
The basics are that you'll need at least one 24 inch x 36 inch photoboard (Warehouse Stationery or Spotlight are good places to get these), a set of mini wooden pegs, glue, a ruler and a pencil as well as your printed photos. The hardest part of making the board is probably getting the pegs aligned right!
Creating the photos
Towards the end of Sarah's instructions, there are some specific instructions on how to create the polaroid look with your pictures - but these instructions are fairly specific to using Photoshop. I realise that not everyone has access to Photoshop, and with the recent enhancements to Picasa, it's now very possible to recreate the Lomo effect and Vignetting that makes a Polaroid pic so unique with this application alone. So hopefully you'll be familiar with Picasa, but if not it's a free photo package that you can download here.
1. Open Picasa, and select the photo that you wish to use. Crop it to a square photo.

2. Click on the tab with the paintbrush and green icon (4th from left). Apply the Lomo effect (or any other effect like Cross Process or 1960's if you prefer) and then use the sliders to adjust the vibrancy of the effect.

3. Then click on the last icon and add the Vignette effect, again adjusting the sliders to get the level of effect you want.

4. Then click on File, and Save your picture as another filename (so you keep the original intact).

6. Click on the middle icon directly above the pictures (to the right of the green play button). Alternatively on the menu bar, click on Create/Picture Collage.
7. Make sure that that Collage type selected is Picture Pile. Then from the Page Format drop-down select 4 x 6. If you don't have a 4 x 6 option, select from the 'Add Custom Aspect Ratio' and add in 4 x 6 here. Take the tick off Draw Shadows as well.

8. Select the photo that you don't wish to keep, and click on Remove. You will then just be left with the photo you wish to turn into a polaroid.
9. Click on the photo and use the hand to rotate, move and resize the picture to the middle of the screen, ensuring it is as centred as possible.

10. Click on Create Collage. Your photo is now ready to print.

11. You may wish to add a text caption underneath your pictures, like in this example.

12. To add a caption, open your saved picture. Click on the 1st tab (spanner) and select the Text button. Use a favourite font and add some text underneath the picture and click on apply. I use Donny's Hand for my photoboard pictures, you can download it here.

13. Then click on File, Export Picture to Folder and save the picture at its original size.

14. Repeat with each picture you wish to use on the board. If you want to create the same sized board as mine, you'll need 28 pictures.
15. Once you've printed your pictures out in 4 x 6 standard photo size (you could use Snapfish or another online service for printing), you need to crop the bottom of the photo. I did this by measuring and drawing a line 11cm from the top of the picture and then cropping the remainder off - you may wish to check whether this length looks right on your own pictures though to incorporate text if you've added captions.
And lastly, enjoy sitting down and arranging all your photos to your heart's content.
If you want any further instructions or assistance, please leave me a comment and I'll be happy to help!


4 comments :
These instructions are great Meghan I would have cried if I had to use photoshop - we have it but it's a nightmare to use when you don't know what you are doing. i am so trying this!!
yours looks amazing. I must give it a go on our return! SO MANY photos!!
Thanks for sharing. I have been looking for one like this for a long time, and it looks so easy! :)
This looks fantastic. I am going to make this my project when my youngest starts school after the holidays! Thanks
Post a Comment